Fast and easy cave photographs
I aim to describe a simple method that I have used to take acceptable caving photographs - snaps perhaps. I am not suggesting that this is the way to win competitions and I will not discuss a variety of equipment and possible techniques. Instead, by concentrating on one method, I hope to make concrete suggestions that can be adapted as necessary.
Equipment
I have used both Practica SLR and Olympus rangefinder cameras. Unless you require particular lenses (close-up for example) or other facilities available only from an SLR, I would recommend a rangefinder camera. I bought an Olympus 35RC rangefinder second-hand for 35 UK pounds. It has a good quality 42mm lens and using the rangefinder to focus on a model's caplamp is wonderfully easy; there is a clear double image off-focus.I have an electronic flash with a guide number (GN) of 28m @ 100ASA and a good compact shape (National PE285, 10-15 pounds second-hand). Following the cardinal rule of cave photography, the flash must be moved away from the camera. For subjects just 2-4m away, moving the flash just an arm's length to one side is enough to give reasonable `depth' to the photograph and avoids illuminating the steam rising from the photographer. An extension cable 1 to 1.5m (4') long allows the flashgun to be connected to the camera whilst held with with arm outstretched. Hotshoe-to-hotshoe and other flash extension leads are fairly readily available. Instead of using an extension lead, I modified the flashgun by fitting a BNC connector and used the removed hotshoe connector to make a lead that attaches to the camera's hotshoe. However, don't think about doing this unless you understand the insides of a flashgun; there a dangerous voltages present and the main capacitor should be treated with respect. With the flash directly connected to the camera it should fire very reliably, at least provided that you remember to switch it on and until it gets damp. I stick PVC insulating tape over all the joins in case of the flashgun to help slow the ingress of moisture. Wrapping both the camera and the flashgun in a cloth or beer towel helps protect them, and can be used wipe spots of water off them when packed.
Unless you have do your own developing and enlarging, slide film is probably the best option. It is good for learning as the slides will reflect the exposure you used, rather than a print that has had the exposure compensated for in printing. I have used Agfa CT200 which gives bright colours and at ~7 UK pounds (1996) for 36 exposures process-paid translates to about 20 pence per shutter press. Using the guide number of the flashgun and the film speed, I write a table of flash-to-subject distance against aperture on a strip of white PVC tape stuck to the back of the camera body.
| For a flashgun with GN 28m @ 100ASA, and hence GN 40m @ 200ASA (GN is multiplied by 1.414, the square root of 2, if the film speed is doubled), the table would be: |
|
Method
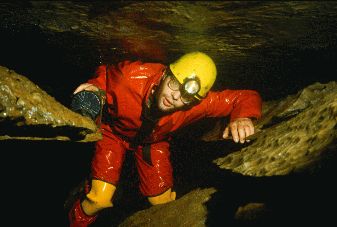
Don't get too ambitious with a simple setup like this. With the flash at arm's length, a chamber wall 5m away will look pretty flat and dull; straws and other formations won't show up wonderfully as they do with strong side or back lighting. People are inherently interesting subjects, whereas formations alone are difficult to photograph well. I try to make a caver fill a fair portion of the frame and hopefully convey an impression of how they are moving through the cave, preferably in a person-sized passage. Wet cave walls and brightly coloured PVC suits look good (get your models to buy MAC suits even if you prefer a boiler suit); dry and dusty caves are more difficult to make look exciting.When you have found a suitable location and a willing subject it is time to unpack the camera, first wiping hands on a beer towel packed last. Having taken the camera and flash out:
- Check that the flash is switched on, charged-up, and connected to the camera.
- Estimate the distance to the subject (from the flash, which in this instance is essentially the same as from the camera) and read off the aperture required from the table.
- Adjust and set the aperture based on a guesstimate of how the subject and surroundings will reflect the light. Make sure that you don't breathe on the lens when setting the aperture. A disadvantage of rangefinder cameras over SLRs is that you won't see if the lens is fogged; it is wise to check that it isn't. Also check that the shutter speed is set to the camera's flash sync. speed.
- Ask the model to point their caplamp at you to focus. It helps to explain that you are using their light as a reference for easy focusing.
- Hold the flash in one hand, with arm outstretched, and the camera in the other.
- Check composition (think about the edges of the frame).
- Ensure flash is pointing at the subject and shoot. If you are `steaming' then it may help to lean forward to get the camera out of the steam just before shooting.

|
|
|
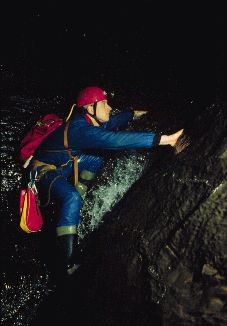
Figure 2 -
Duncan Mercer in Aran View Cave, Co. Clare, Ireland.
Photograph taken with a single flash held in my left
hand. Simeon Warner © 1994 |
Progression
Show your photographs to your club and your friends, I have rarely found them short of comments. Figure 1 was taken for a `freshers' slide show and was good enough to get helpers for the next photography trip. Read about various techniques in manuals such as those by Chris Howes (1) and Sheena Stoddard (2). Look at published photographs to see where the flashes were placed; decide whether bulb or electronic flashes were used. Think about how much light the cave environment will reflect; in all but the most reflective cases (wet, light-coloured rock, as figure 2) I find that the calculated aperture is a little small so opening the aperture one or two stops may give a better exposure, consider bracketing shots.
References

